A Workshop Layout That Keeps the Work in View
A workshop layout with visible zones makes active work, tools and unfinished pieces easier to read, so a small room can be reset without losing its thread.
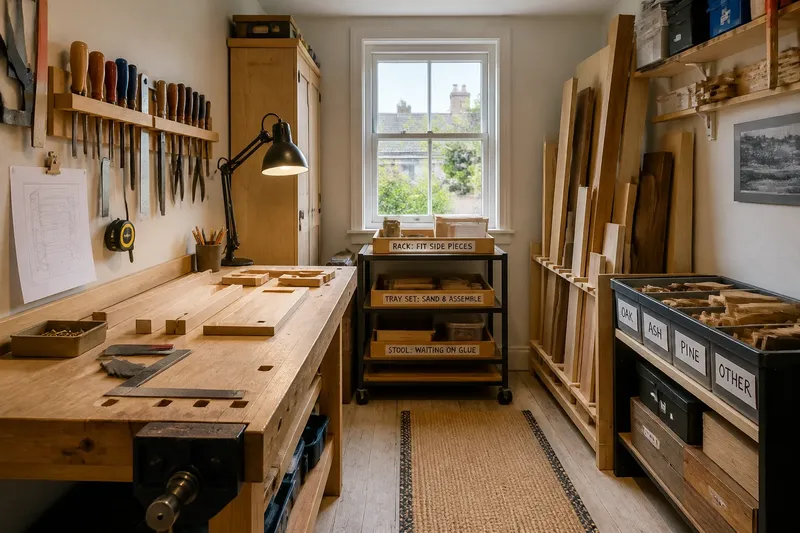
A workshop layout with visible zones can make a small room easier to use without adding a shelf or shifting a wall. Imagine a county-town maker using a narrow spare room for simple wooden objects: a stool, a wall rack and a run of small trays. At the start, the bench holds the current job, yesterday’s offcuts, a tin of screws and several tools with no obvious home. The difficulty is not a shortage of floor space alone; it is that the room does not show what is happening.
This invented situation is useful because its materials and tasks are ordinary. The maker needs to see the active piece, reach the tools used on it, and keep unfinished work from being mistaken for scrap. The layout is reorganised around those three states, not around an idealised workshop or a complete inventory of every possession.
What should the room tell you at a glance?
A readable workshop answers three questions as soon as you enter: what is in progress, where the next action happens, and what is waiting. If those answers require lifting a stack or opening several boxes, the room is hiding useful information. Visibility here does not mean putting everything on display; it means letting the important work remain legible.
The maker begins by naming the room’s current activities: measuring and marking, cutting, assembling, and keeping pieces between sessions. That short list prevents the arrangement from following the shape of the existing clutter. A task such as finishing may happen elsewhere, so there is no need to dedicate scarce bench space to it if the room is not used for that work.
The first distinction is between a place of action and a place of waiting. The bench is for the piece being worked on now. A separate, shallow holding area is for parts that are ready for a later session. Keeping these states apart makes it harder to forget whether a component is unfinished, ready to fit, or simply spare material.
How does the maker divide a narrow room into visible zones?
Rather than drawing formal boundaries on the floor, the maker uses existing surfaces and containers to mark each zone. A clear stretch of bench becomes the active-work area. A labelled tray beside it holds the small parts for that job, while a shelf near the wall receives pieces that must remain together between sessions.
The tool zone follows the work, not the other way round. A tape measure, pencil, square and the hand tools used most often sit within reach of the bench, in a shallow rack or a fixed outline on a board. Less frequently used tools stay in a cupboard or a closed toolbox. This gives the eye a quiet baseline: the everyday tools have known positions, and an empty place can signal that one has wandered.
For materials, the maker separates usable stock from offcuts worth keeping. Longer boards stand upright in a stable rack where their lengths and widths can be seen; small remnants go into a modest bin, sorted by a practical distinction such as wood type or likely use. The point is not to catalogue every scrap. It is to prevent a useful piece from disappearing beneath an unexamined heap.
A distinct holding zone makes unfinished work visible without taking over the bench. A shelf, rolling cart or labelled tray can serve, provided it does not obstruct a route or create an unstable stack. Each project occupies one contained space, with its loose components kept together. If a piece is too large for that arrangement, it can be given a clearly defined parking place rather than left wherever the last session ended.
What moves first, and what stays put?
The maker clears the bench before moving storage. Items are sorted into four practical groups: needed for the current job, used often, needed occasionally, and uncertain offcuts or objects with no present role. This is not a demand to discard everything ambiguous; it is a way to stop an undecided object from claiming the most useful surface.
- Current work: keep the active piece and only the tools and parts needed for its next operation on the bench.
- Frequent tools: place regular hand tools where they can be reached without crossing the workpiece or opening a deep container.
- Occasional tools: store them together, but outside the most accessible reach.
- Unfinished pieces: give each one a contained, visible holding place with its associated parts.
- Offcuts: separate potentially useful stock from fragments that have no clear use, keeping the retained material within an easy-to-scan area.
- Empty surfaces: leave a small clear patch for measuring, sorting or setting down a component during the next session.
After that sort, the maker moves the tool rack and holding shelf, not the heavy bench. That choice matters in a small room: shifting a fixed work surface can create awkward routes and require rearranging everything else. A quick check from the doorway and from the bench shows whether the active piece can be seen and whether the path between work and storage remains clear.
Say the maker is assembling a wall rack and has several cut pieces, screws and a paper pattern. The pieces go together on the holding shelf, the screws into the labelled tray, and the pattern is clipped upright beside the bench rather than spread under the work. At the next session, the maker can identify the assembly, see its components and begin without first excavating the tabletop.
How can unfinished work stay visible without becoming clutter?
Visibility is most useful when it carries information. A bare board on a shelf may be hard to distinguish from spare stock; a board kept with its matching parts and a simple project label is easier to read. The label need not become a diary. A short description such as “rack: fit side pieces” gives the returning maker a clear next action.
Containment also limits the visual noise of work in progress. A tray for small components, a shallow box for a paper pattern, or a board with clips for related notes can keep a project together without hiding it in a closed cupboard. Choose containers that suit the size of the work; a deep box can bury small pieces, while a shallow tray makes them easier to scan.
There is no need to make every tool visible. Exposing rarely used equipment can make a small room feel busier and leave less protected storage for delicate or sharp items. Keep the frequently used group apparent, and let closed storage handle the rest. Safety and storage choices should follow the relevant manufacturer instructions and local requirements.
Nor is it worth labelling every drawer, colour-coding every category or building a bespoke rack before the zones have proved useful. In this imagined room, a piece of masking tape and a borrowed tray are enough to test whether the holding area belongs beside the bench or on the opposite wall. The room can be refined after its ordinary use reveals what is awkward.
What questions help test a workshop layout?
Where should the active work sit?
Place it on the surface that gives the maker a comfortable working position and a clear route to the tools and materials for the next task. Keep unrelated stock off that surface so the current piece remains visually distinct.
How should tools be arranged in a small workshop?
Keep the tools used regularly near the relevant work area, grouped by task or by how they are handled. Store occasional tools together elsewhere, and leave enough space to return a tool without covering the work in progress.
What is the best place for unfinished projects?
Use a visible, contained location that keeps each project’s parts together and does not obstruct a walkway or working surface. A shallow shelf or labelled tray often makes the state of a project clearer than a closed box or an unstructured pile.
How can you tell if the layout is working?
Notice what happens when the maker returns to a task: can they identify the active piece, find its associated parts and clear the bench for the next operation without searching through unrelated material? If one of those actions repeatedly stalls, adjust the zone involved rather than reorganising the whole room.
What changes after the room is reset?
In the imagined workshop, the result is not a larger room but a more legible one. The bench has a defined active area, common tools have visible homes, and unfinished pieces wait together on a separate shelf. The maker can see what is underway and what is available without treating every object as part of the same pile.
The layout also makes resetting modest. At the end of a session, the active piece goes to its holding place if it cannot remain on the bench; its small parts return to the same tray, and the everyday tools go back to their rack. That routine is short because the room already distinguishes the objects’ roles. It does not need a perfect surface or a full inventory to be useful.
For a real small workshop, begin with the work that occupies the room most often and give it the clearest visible zone. Leave room to change the arrangement as projects shift, but keep the basic signals consistent: active work here, tools close by, unfinished work together. A workshop layout that keeps the work in view is not a display; it is a quiet instruction the room gives its maker when the next session begins.